Companies
FAQ
Check our FAQ before adding questions.
Category: Main
| Software (7) |
| Training (24) |
Articles in Category: Top 10 most voted
Does LMS King allow embedded video from another site as presentation materialQ. Does LMS King allow embedded video from another site as presentation material? For example, if we wanted all our videos to served by Vimeo can we link them in LMS to play within the course?
A. Currently No. But it does support Youtube videos. However, now that Vimeo has come to my attention, I'll investigate adding it. I am also going to investigate moving the code for replacing HTML tags for the videos and other items Eg: {youtube}KJHHgj768jgjhg{/youtube} into a plugin system so that we can add any number of tags and our plugins will simple parse and replace the content.
How do I add a lesson that:
- contains only media (video, audio, document, file, link);
- contains only text;
- contains media and text;
A. This would be a Text only type question. OR if all the pages in the lesson are for presentation only, then create the lesson as a Presentation type instead of an Exam type. Presentation type expects no inputs from the users.
You can add HTML code using various Editor plugins, but our system has 2 editor buttons, 1 is for the fileshare component, where you can add a link to a file that you have uploaded to the site and set the access permissions on it as to who can access the file.
The other is for adding amazon widgets and youtube videos.
Q. Does LMS King integrate with Virtuemart so that users can purchase using the cart system that I already have to sell my other products.
A. At the current time, Virtuemart does not work on Jooml 3.1+ so in short the answer is No. But when it is released, we will be investigating the possability of this.
Q. How do I add a module to a particular course?
A. The Certification path contains Courses, The courses contain Lessons, the lessons contain questions.
To translate LMS king to another language, it is easiest to use our built in translator.
Donating your translated and checked langage files for other users would be much appreciated.
Go to the Extensions Tab.
On the left, you will see the installed extensions.
Under Translator, you will see a menu item, Config.
Select it.
In the page that opens, enter your Google Translate API key, which you can generate here:
https://console.developers.google.com/project
- Go to this page and click the Create Project button.
- Enter the name for your project.
Once saved, you will see a table with all your google projects listed.
Click the name of the project that you just created to open it's pages.
On the left, you will now see the Credentials page.
Here, you can generate the keys that you will need to use.
You can test your new key using this url:
If you are having problems understanding why the system is only showing you getting a score other than the 100% grade that you think you should have gotten, then it's most likely that you've configured lesson weighting.
So, lets explain a little about how lesson weighting works.
It is a complicated system, so you should really understand it before you try to use it.
Did you watch the powerpoint that explains how it works?
Here is a link to a powerpoint explaining the weighting system.
Now, for a working example of how weighting works.
A Lesson(exam) has a pass mark. It doesn’t have weighting.
A course has weighting and this is what you used for the lessons inside it.
If a course has a pass mark of 50% then the student must get a total of 50% result from the sum of the results of the lessons inside the course.
So, if a course had 2 lessons a and b
If a had a pass % of 80% and b had a pass % of 40
Firstly, the student would need to get 80 and 40 respectively in these lessons to even trigger the further calculations for completing the course successfully.
So, if a student gets the 80% and 40% exactly (for this example) we then go further to see what % of that result is going to be used in calculating the result for the course.
So, if we give lesson (a) a weighting of 10% and lesson (b) a weighting of 90%, then 10% of 80% and 90% of 40% would be added to get the total mark for the course.
In this example, lesson (a) contributes 10% of 80 = 8% and lesson (b) contributes 90% of 40 = 36%
So, in the end, the student gets on the course a result of 44%
NOTE: There is no pass mark for a course because to pass the course, the student must pass each of the lessons. However, as you can see, because of the weighting, this student would pass with a low score.
The process can be compounded even further, if your Certification path were to have more than one course in it. And each Course had a weighting assigned to it.
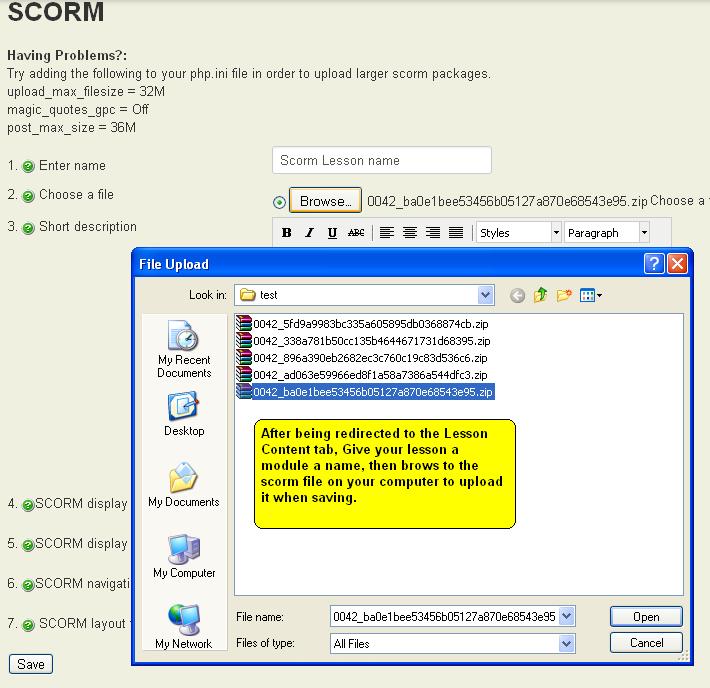
If you get the error manifest file not found when you are adding scorm modules, check the upload_max_filesize setting in your php configuration.
It will most likely be 2M which means that you can only add files of 2mb
In the administrator folder add the following line to your php.ini
upload_max_filesize = 10M
This will allow you to upload a 10mb scorm module.
If php.ini files don't work on your server, then contact your hosting service to change this setting or use the appropriate commands in the .htaccess file.
Q. How do I set file storage and default location?
A. You set the locations in the admin of the Media Manager extension that you can find in the Extensions tab of the component.These settings will effect all of our components EXCEPT the storage location of SCORM files.
Q. How canI quickly create a certification path for a SCORM module.
A. Lets start from the beginning.
1. Go to the start tab and Click the Open Create link in the left menu.
Then select the Creation Wizard.
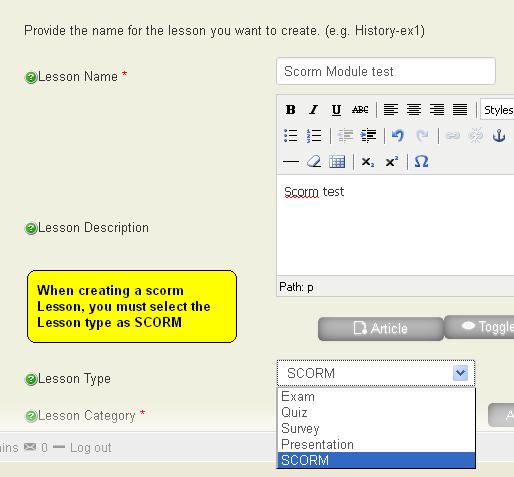
2. Fillout the lesson details form and ensure that you select the Lesson Type as SCORM.
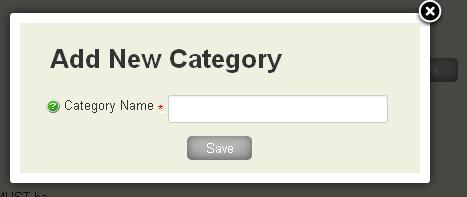
3. Select select your category. If the list is empty, click the button to add a category and you will see a popup where you can dynamically add the new category.
4. Select the Teacher and asistant for the lesson. If these users haven't been created yet, then you can click the Create links to the right of the input fields. This will open the user manager in a new tab of your browser where you can create the new user account. Ensure that you go to the Second tab and assign the new user to the correct group. IE Teachers or Assistants.
When you have saved the user accounts. Come back to the wizard and click the refresh link.
Now select your teacher and Assistant for the new lesson.
5. If you have the feedback component installed and configured, you can select a feedback form where the student can use to provide feedback about the lesson once completed. This is not a required field. It is optional.
Click Next to go to the next page of the Wizard.
On Step 2 of the wizard, you will see the configuration page for the lesson.
This page controlls how the lesson will appear and when.
In SCORM lessons, many of the fields here will have no effect, so are unnecessary.
The field "Pass Marks %" is needed for reporting purposes and calculating succesful completion of the lesson.
With this field filled out, you can continue to the next Step of the wizard.
On the next step, again, most fields have no effect on a SCORM lesson.
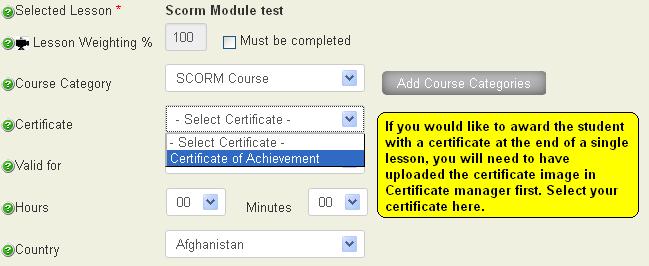
If you want to provide the student with a certificate on completion of this ONE lesson, then here you can select a pre uploaded certificate that they will be awarded on completion.
Continue to the next step of the wizard.
This is the final step for SCORM lessons.
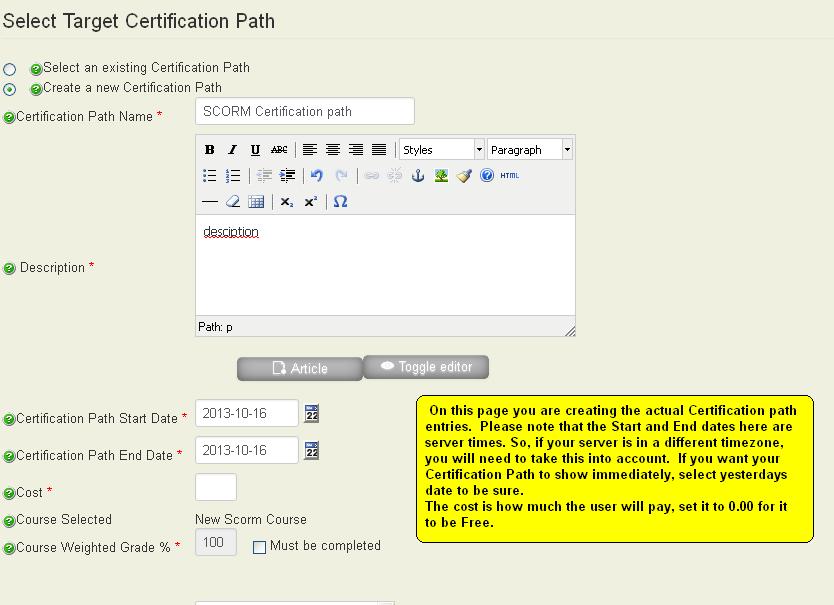
Here you are creating the certification path that will be first visible in the front end.
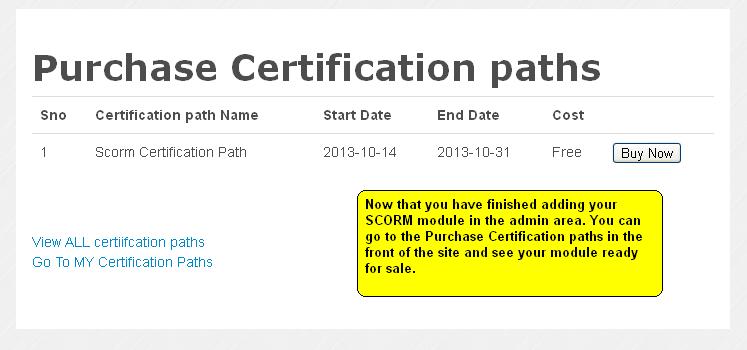
Please note that the Server is in a different timezone, the Certification Path may not show immediately, so you will need to take this into account when selecting the Start Date. To be sure, if you want the Certificaiton path to show immediately so that you can test it, then select yesterdays date as the start date.
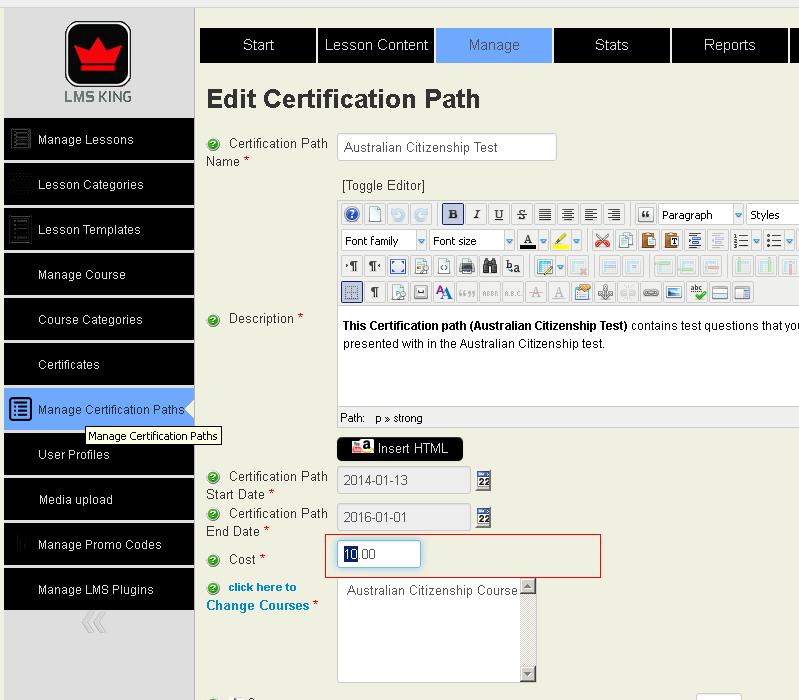
The Cost field is how much the user will pay to access the Certification Path. If you set it as 0.00 then it will show as Free in the front end.
On this page, you need to select FINISH.
Once you are finished, you will be taken to the Lesson Content tab where you can upload your scorm module.
Once you have saved this, you should immediately see your lesson in the Front end of the site as available for purchase.
How do you add a teacher or assistant in Joomla LMS KING?
You can do it from the creation wizard as you create your content.
Or, you can go to the Joomla user manager and add the new user, on the permissions tab, add the user to the Teachers or Assistants group.
These groups would have been created during install.
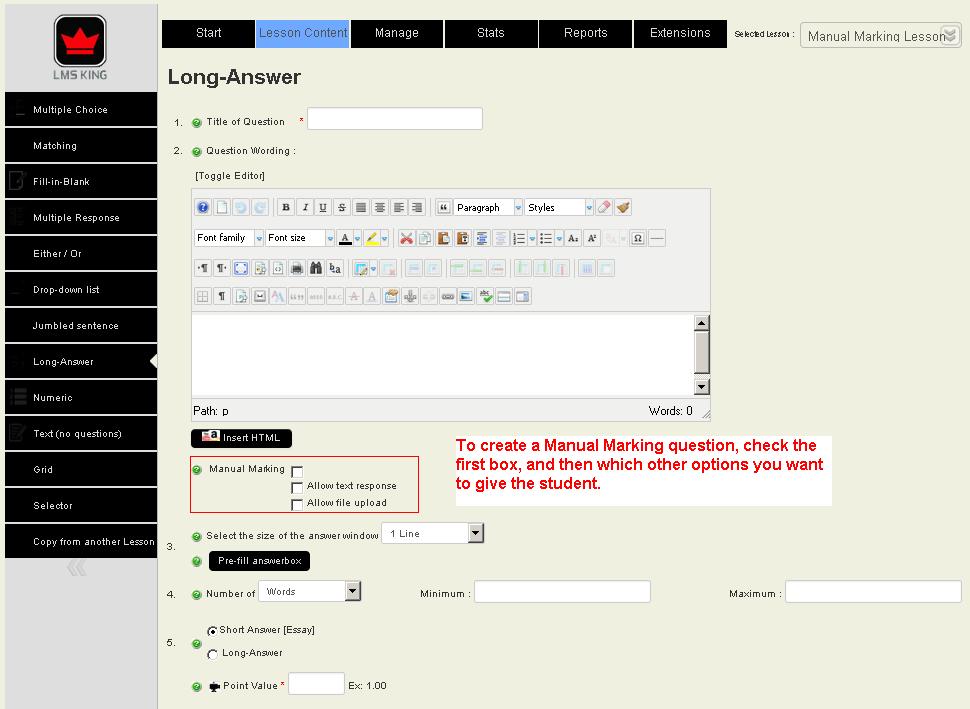
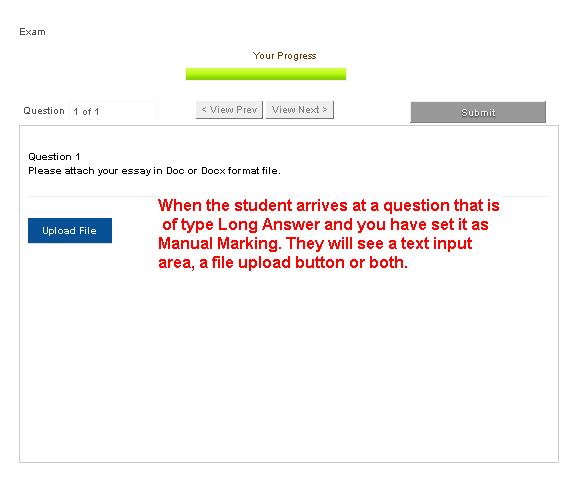
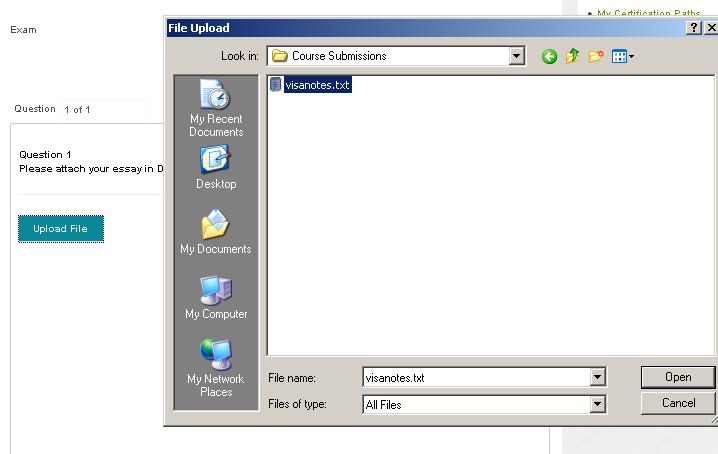
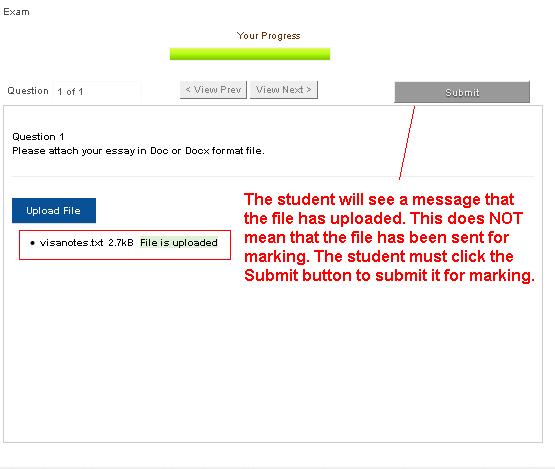
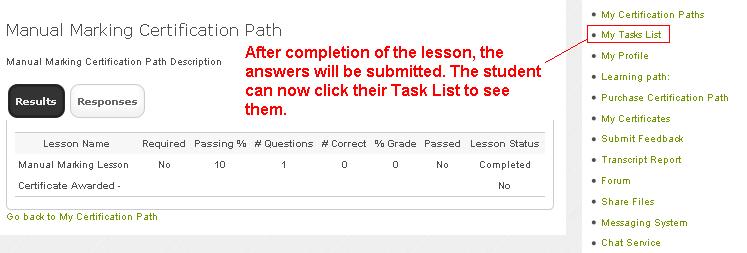
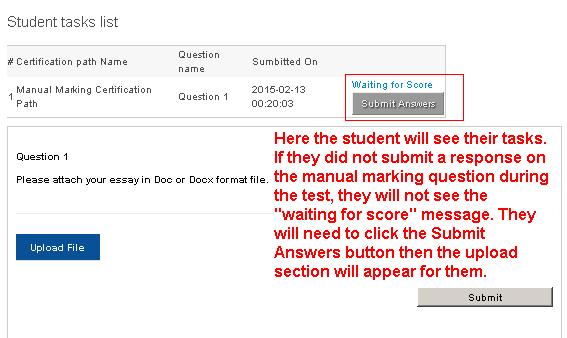
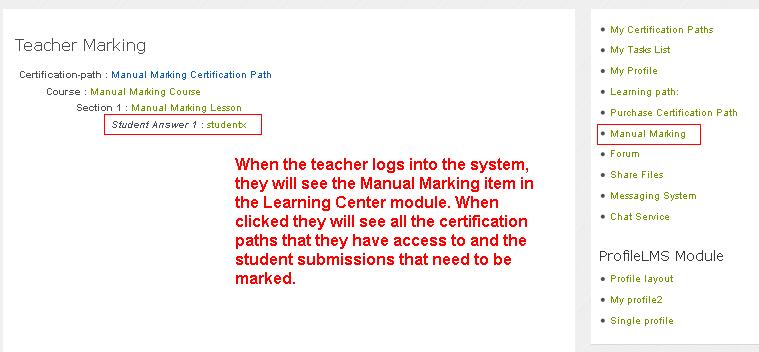
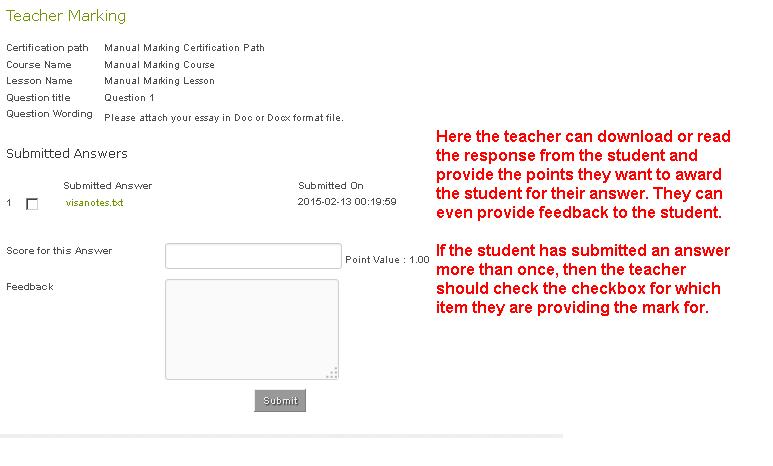
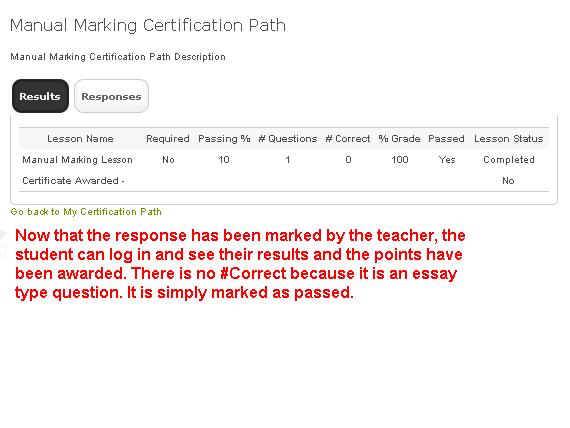
In the images below I have mapped out the steps that both the student and teacher will take during the process.
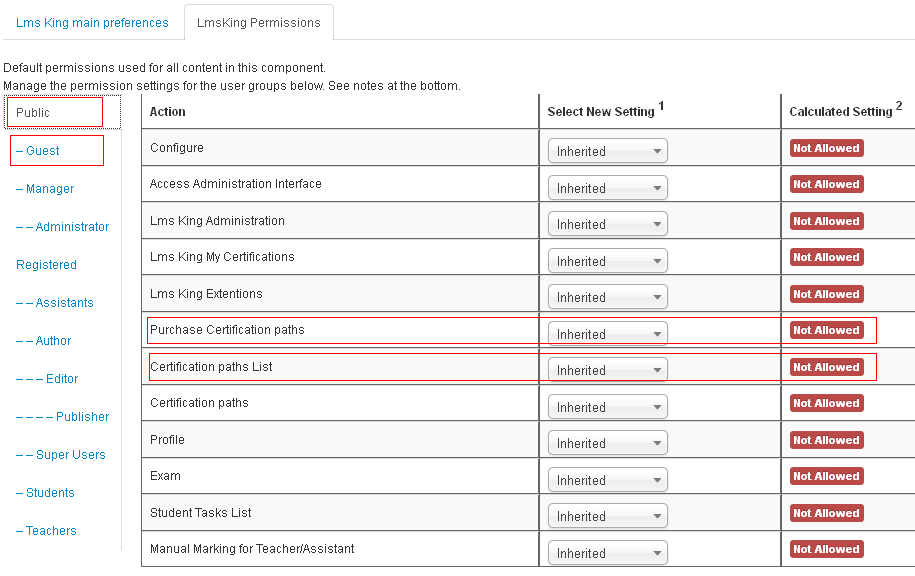
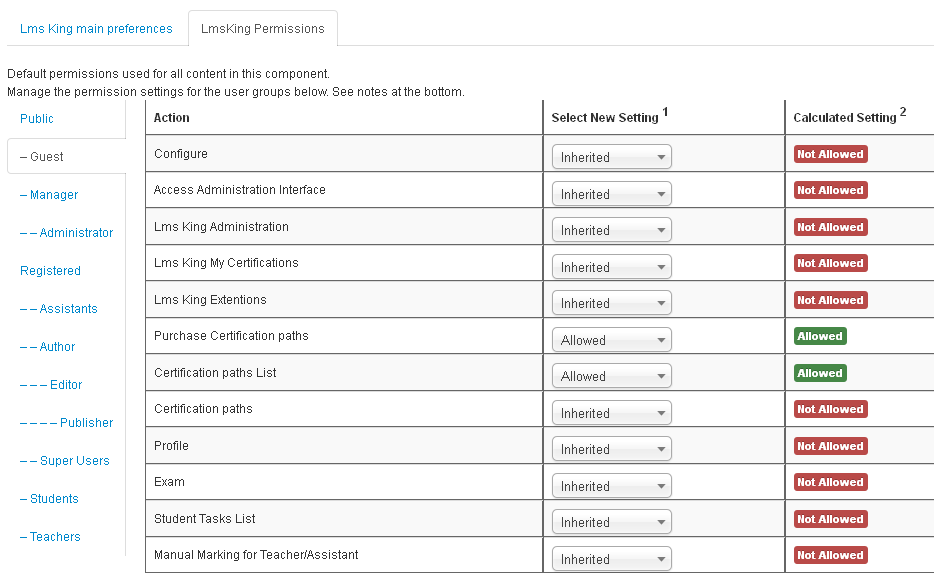
If you are seeing the Not Authorized message when trying to access parts of ANY Joomla extension, then you need to set the permissions for that page in the Options of the component.
In this example, we are having problems accessing the following items from the front end when not logged in:
- Certification Paths
- Purchase Certification Path

So, Log into the admin area of the component.
Open ANY component (in Joomla 3.x) and select the LMS King component (or whichever you are having problems accessing) on the left hand side.
In Joomla 2.5 open the Specific component.
Here you will see the reason we are seeing this message.
To fix this we simply select the Inherited selector and change it to Granted and save.
Now you can accss the Options in the front end. However, this specic problem has been resolved in version 3.2.0.5 of LMS King and onwards.
To add an image to a presentation or text type question is simple.
It is best done using the JCE editor in the joomla system as it allows you to upload and browse for your images.
Firstly, create a presentation type lesson, or an exam then add a text type question.
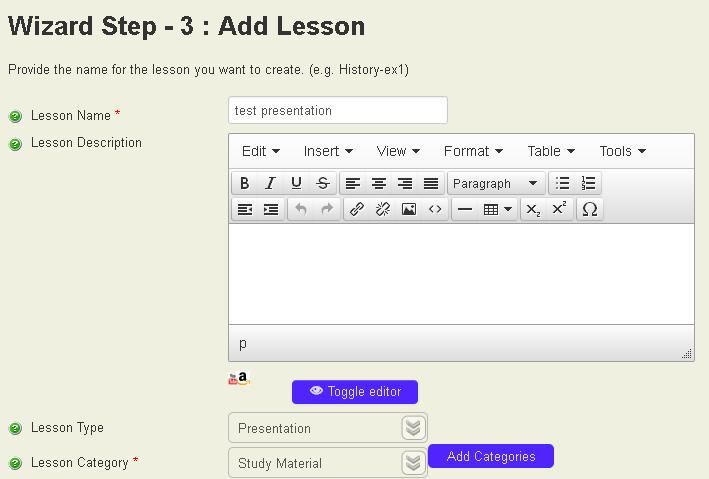
When you open the lesson content tab for a presentation type lesson, you will only see the text type question as default.
Here, add your Slide title, then in the wysiwyg editor area, on the toolbar of JCE, select the insert image button.
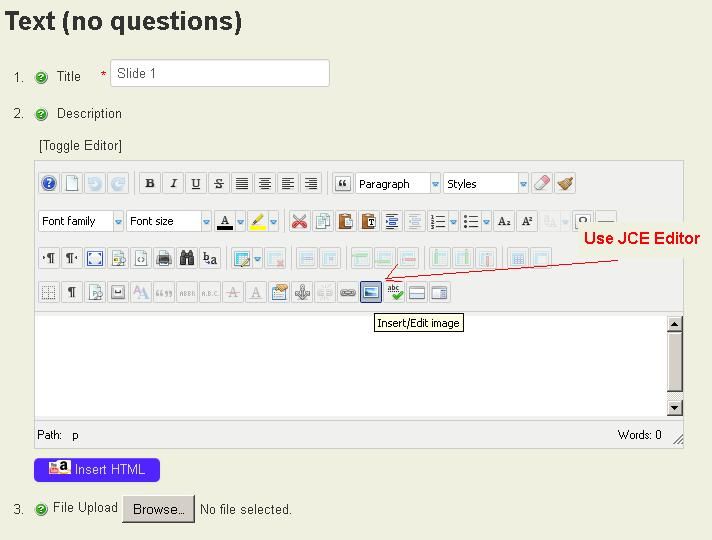
Browse and select the image you want to insert.

Thats it.
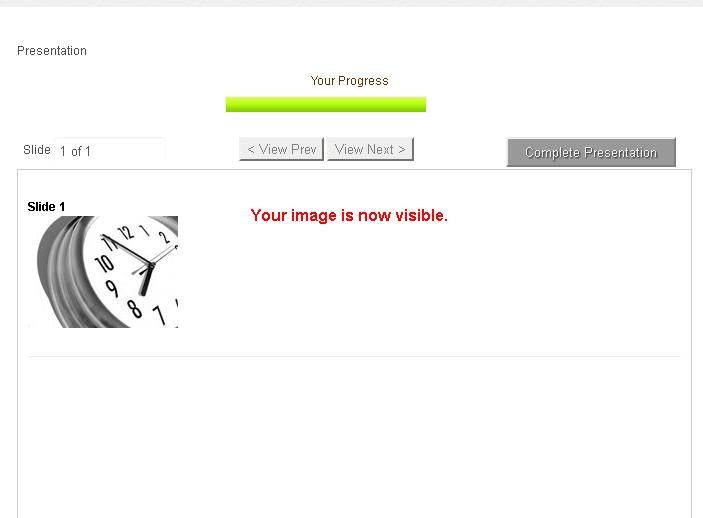
Then in the front end, users can see the image as below.
In order to add videos to the content of the LMS, you need to install and publish the allvideos plugin from here:
http://www.joomlaworks.net/extensions/free/allvideos
You can use the plugin to easily embed videos hosted on popular services like YouTube, Metacafe, Vimeo (and many more) inside your Joomla! articles (content items). Additionally, it allows you to playback almost any video/audio filetype directly from your server or a remote server, giving you the competitive edge when it comes to rich media content.
{ youtube}heu37ej3qs{/youtube}, { flv}batman_darknight {/flv} or { mp3}pixies_bonemachine{/mp3}.
All of the supported systems can be found on the above page too.
Q. How to I add a new lesson to an existing Certification Path?
A. Well firstly you sholdn't modify a course that has already started and students have already responded to lessons. You can corrupt data.
You should clear all the user data for that Certification path first.
To add a new lesson, you can go to the Manage tab, in the Lesson Manager and add a new lesson from there.
Alternatively you can go to the creation wizard and add the lesson there. However, it's advisable to use the manage tab.
Once you have added your new lesson, you should activate it.
You can activate it via the selector to the right of the tabs.
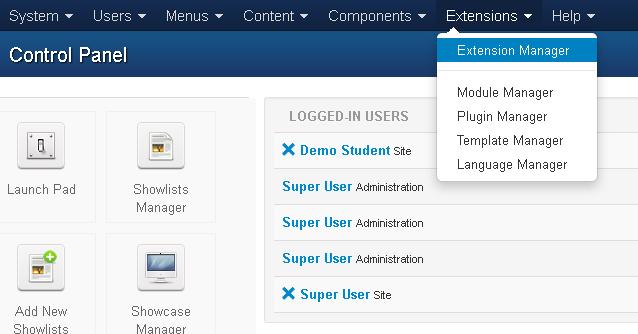
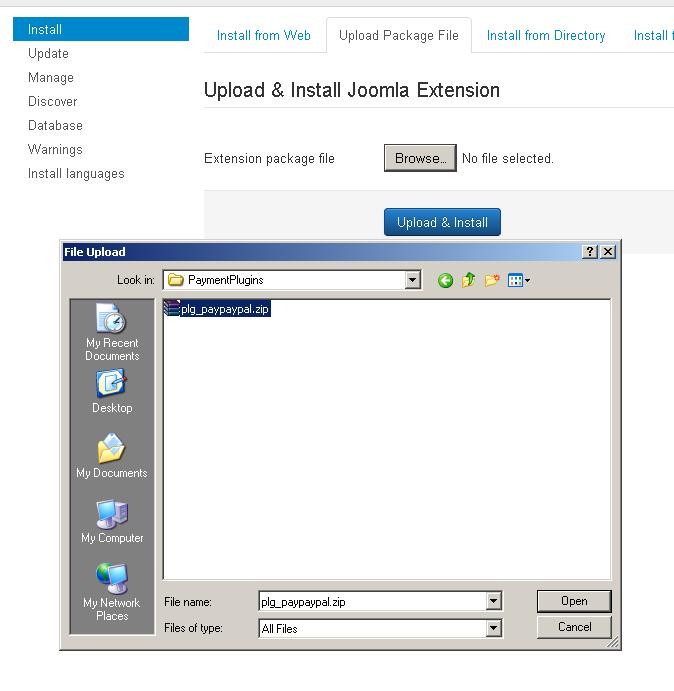
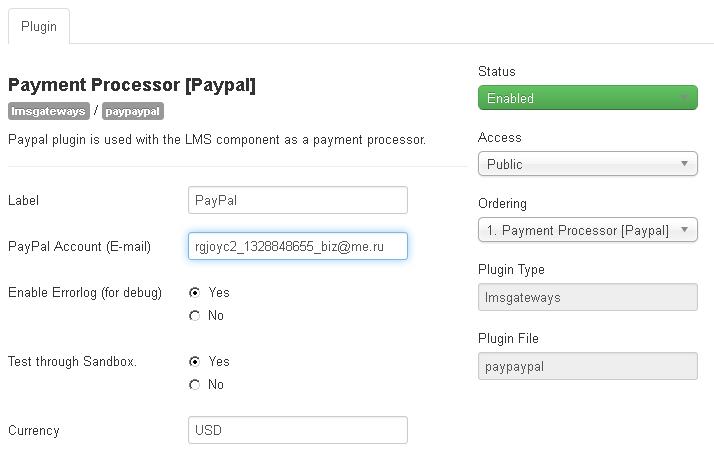
To enable the payment system in LMS King, you should follow these steps.
1. Install the Payment plugin that you need to use.
If you have the lite version, Payment plugins won't work. If you have the Professional version, please just email us and tell us which payment plugin you want from our list of completed ones and we'll email it to you.
2. Publish and configure the payment plugin.(Use the filter to select the lmsgateways group)
3. Edit your Certification Path and set a price greater than 0.00
4. Now, on the Purchase Certification Paths page, you will see the selector for payment processor.
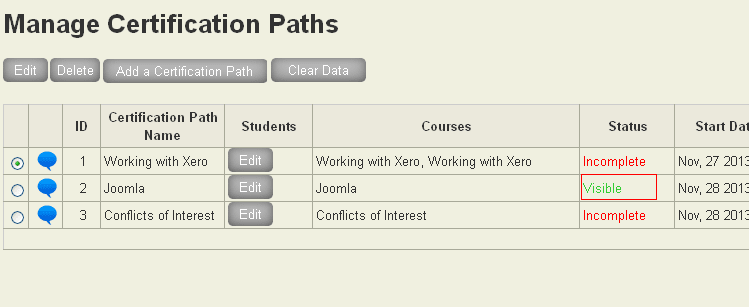
If you are having problems determining why your Certification Paths are not visible in the front end then you should go to the Certification Paths manager in the admin area.

Mouseover the Warning message and you will see our hidden diagnostics checker.
This image tells me that there is a lesson unpublished.
So, lets go to lesson manager and see it's configuration.
Select the lesson in question and click the configure button.
This will take you to the configure page.

As you can see here, When creating the lesson itself, the option to Make the exam visible was not selected.
This is the option for publishing the Lesson itself.
Check the Option and Save.
Now in the Certification Paths Manager, we can see the Certification Path is Visible in the front of the site.
Q. How do I edit my questions once I have added them.
A. On the Lesson Content tab, this is where you create your questions.
If you scroll down, you will see in the footer section of the page, ALL of the questions in that currently selected lesson.
If you click on the icon in the second colum, you will see a context menu. Here you can select Edit. Once selected, the question will appear in the main area above for editing.
To download your extensions, simply log into our site and click the My Downloads link on the My Account menu.

Q. What is the quickest way to get started with LMS King.
A. With our creation wizard, you can get started in as little as 10 minutes.
The lesson wizard works in reverse to how people picture the structure of the Course system. Unfortunately it seems that we will need to rewrite the wizard and add a couple of new ones in order to resolve this.
Currently, the wizard creates the Lesson, then the course, then the certification path and then you can put the lessons inside it.
The reason for doing this was that it allows you to exit at any of three stages and your lesson, lesson with Course, Certification path with course and lesson, will be created.
Because people seem to be having a little difficulty getting their mind around this, we've decided to break it down into 3 smaller wizards.
One to create a certification path, course and lesson as it is now.
One to create a course.
One to create a lesson and add questions to it.
However, doing this, does negate the reason for actually having the wizard in the first place.
These are the main points for certificates:
1. Lesson types must be exam/quiz
2. For all questions 'point' value is a must
3. All courses must assign certificates
4. CP also must assign Certificates
5. Each Lesson pass % must be assigned in lesson config.
In order to change the order in which your lessons show, please follow these instructions.
Firstly make sure that no users have purchased access to the Certification Path. To do this, go to the Certification Path manager page, select the certification path that contains your lesson, then click the Clear User data button at the top of the page.
If somone has access to it, then you cannot change the order for database integrity reasons.
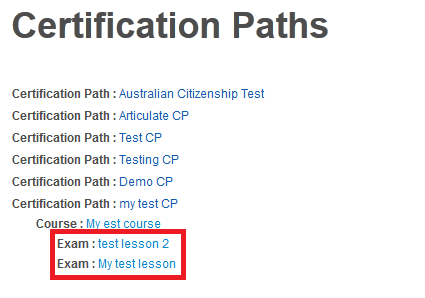
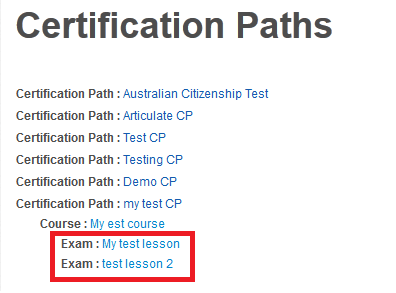
Step 1: See the Lesson order in the front end.
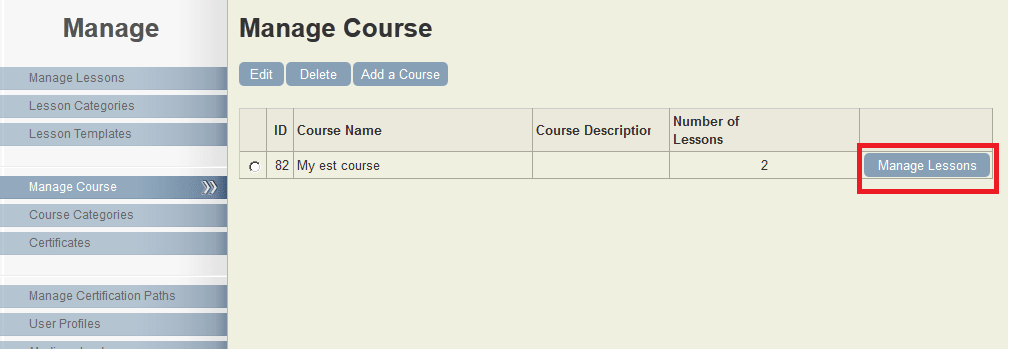
Step 2: Go to Course Manager and select Manage Lessons
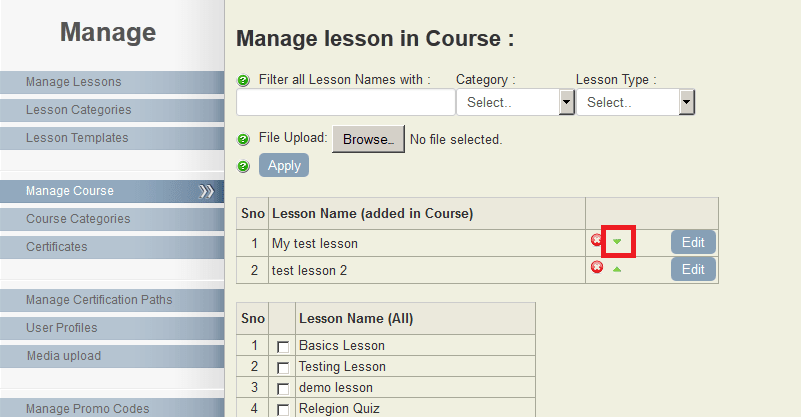
Step 3: Change the lesson order by clicking on the arrows.
Step 4: See the new order in the front end after refresh.
The LMS Professional version contains between 18 and 20 Joomla extensions.
We have had to break it up into 2 sperate packages.
First install Pack 1 and then Pack 2.
When downloading them from our site, you will recieve a single file with _UNZIP_FIRST.zip at the end of the filename.
Unzip this first. Then install the packages of extensions.
Once installed, you can publish and position the modules that you want and publish the plugins that you need.
You can also see our turotials section for more info.
NOTE: When installing, Please click the link to make the final permissions changes.
There is no need to log out of the site.
When your session expires or you clear your browser cookies, you will be logged out of the site.
Alternatively, you can select Logout from the My Account menu.

